A beginning guide to drip irrigation.
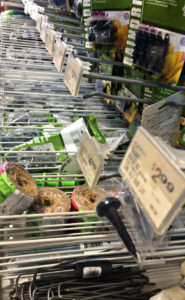 The drip irrigation aisle at Laurel Ace
As Maria Von-Trap taught us: let’s start at the very beginning. Drip irrigation is a specific type of irrigation technique that complements things like sprinklers and timers, and other irrigation techniques. However, when you hear people talk about installing a “drip system” they usually just mean all the plant watering that they don’t have to do by hand. So if this guide seems a little too simplistic, it means that you already know that difference and instead of reading this blog may we suggest something a little more on your level…Here are the complete works of Shakespeare (please send us a quick note to explain what the heck the plot to Cymbeline is we are so confused).
Now for the rest of us, This blog consists of the answers to these basic drip irrigation questions:
-Why should I install a drip system?
-What kind of plants benefit from this?
-is it hard? I hear it takes lots of pieces.
-I already have a garden bed established. Is it too late to install a drip system?
Why Should I install a drip system?
There are two schools of thought on this:
-One, Drip systems only use the amount of water needed for the plants in question and thus are more economically responsible. In fact, Colorado State University states: Drip irrigation exceeds 90 percent efficiency whereas sprinkler systems are 50 to 70 percent efficient. You can even hook up your drip system to your greywater (the link goes to a great website on it) or rain collector bins. Less water waste is a win-win for everyone.
-Two, it is way easier than hand watering all those plants, and let’s be honest, Netflix got another year’s lease on Friends and we have some serious binge-watching to do so we just don’t want to go outside.
So, Drip systems save water, and save time. This seems like the perfect solution! Why shouldn’t I just use it on everything? Well hold up there. Drip systems have some limitations, which bring us to:
What kind of plants benefit from this?
As a general rule, a traditional garden plot can be irrigated this way fairly easily and safely. It also allows (according to Oregon State University) for efficient watering of “oddly shaped fields or those with uneven topography or soil texture”
The real problem starts when you add things like raised beds and potted plants. You can install drip systems, but you will need some special equipment. Also, remember that you will need to a) not trip over the drip lines when you are working in the garden and b) You need to make sure that your equipment isn’t getting worn or old periodically.
What is going to benefit most from installing a drip system is your vegetable patch, and your rose garden, in fact, drip irrigating tends to lead to larger crops for certain vegetables. Oh, and your lawn, but we live in the Bay area and we have replaced our lawns with more sustainable native plantings right? (Watch out for our May blog where we will talk about lawn vs, native plants)
Okay, so you have an idea of what you want to plant and how. Now is the time to install your system, before you start planting. You can do it after planting, but it is easier this way. Which brings us to:
Is it hard? I hear it takes a lot of pieces.
We are not going to lie, it does take some planning. There are also a plethora of items that are available. But let’s break it down into a simple combination.
First make a garden plot plan. This is as simple as, sit down right now, take out a piece of paper and a pencil and draw a quick picture of what you want your garden to look like. You will want approximate dimensions, and some ideas of the plants that you want.
This can be a blueprint like:
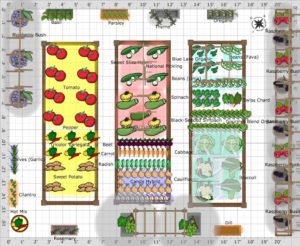 The Old Farmers Almanac has great resources on garden plans.
Or it can be something like what we usually do:
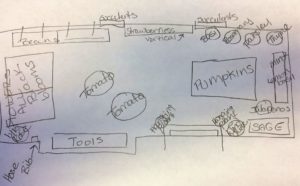 Our hand-drawn apartment patio garden plan
(yes, we have an all black flower garden at home)
Second prep your beds. As in make sure that before you go to the store that your planting area is really the size you though it was, and is suitable for planting. We like to take this time to turn our soil, or refresh soil in our raised planters.
Third, Head to the store (All three of our stores sell drip parts)
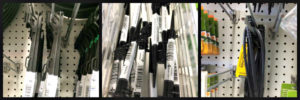
![]() We sell drip parts in individuals or in packs.
We sell drip parts in individuals or in packs.
So here we need to stop and tell you what things are:
soaker hoses –Are not traditional “drip” systems, what a soaker does is literally what it sounds like, the water is constantly leeching out of the hose so it provides constant water in low amounts to wherever it is. This is the easiest way to do things, but not the most environmentally friendly (although still more friendly than hand watering, and can be hooked up to greywater systems)
Timers – These are exactly what you think they are, they turn the water on and off at specific times for specific intervals. There are of course now, blue-tooth enabled versions that let you alter them via your smart phone.
Emitters -Think of these like the sprinklers. They are what make a drip system a drip system. Thy can be drippers (so they drip water onto the ground) bubblers (water bubbles up) and misters (a fine spray is emitted) what you want depends on what you are watering. Emitters are rated (measured) at gallons-per-hour (GPH) which is the flow rate. Emitters also can only take so much water pressure. They also have these ratings on them, be sure that you understand the water pressure going through your system, you may need a pressure regulator. If you are not sure, then ask we are here to help. Some pressure regulators come without filters, in that case you will want to purchase a filter as well. However, we recommend using a regulator that comes with a filter. If you need to elevate your emitters in the case that a root system is a little higher than your hose sits, you can use a riser to do that.
 Risers with emitters, risers with bubblers, and risers with tubing.
Drip hose/tubing– This is different than soaker hose. It is usually black or dark brown (some has a blue line running down it). It usually comes in two sizes so be sure that you know what size you are getting. You will also want to get stakes for the tubing to keep it in place. Some stakes have risers built in.
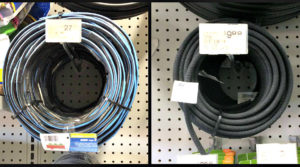 Blu stripe drip tubing versus soaker hose. Notice the difference of the material.
Hole punch, Hose-cutter, plugs: These are three separate things that you should just buy together. A hole punch allows you to place the emitter directly in the hose. The Hose cutter gives you a nice clean cut so that the hose fits into fittings better, the plug is for when you screw up with the hole punch. Also, a plug is good to have around if you decide to move an emitter to another spot on the hose.
 Hose punch, and plugs go together like peanut butter and jelly.
Fittings– Just like in normal plumbing you need things to fit the tube to other things (like your pressure regulator or your hose bib). What fittings you need are determined by what you are doing, If you aren’t sure, take a picture of the things that you are trying to connect and bring it in (put something like a ruler in the pic to give a sense of scale)
Backflow preventers or anti-siphon devices – This is simple, all plumbing systems need to keep water flowing in a specific direction. There is a slim chance that you don’t need this for your system (for instance your hose bib is on top of a mountain and your drip hose runs straight downhill to your garden) but you probably do want them. Some municipalities require them in fact, and if you are using a greywater or rain barrel connected system you really don’t want the water coming back into your water supply.
I have what I need now what? Now you need a simple diagram:
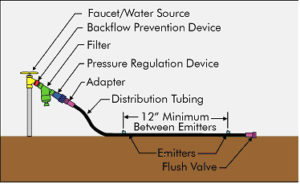 Simple Drip diagram courtesy of Alliance for water efficiency.
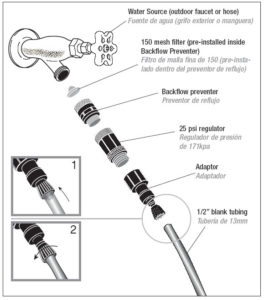 Here is a close up diagram from our friends at Rainbird.
Yes, we know you want a step one step two sort of a tutorial. Well for that, we need to turn to video:
https://youtu.be/SSHimq_J33I
These guys do a really good job on a step by step basis of installing your drip. And there you have it, now you know about drip irrigation, next on to Shakespeare!
Wait! I already have my bed established, can I add drip?
Yes, of course you can, it just means that you have less flexibility in laying your drip system out, because as opposed to planting around the system you are irrigating around the plants. We recommend having plenty of hose plugs for this though.